Showing posts with label how-to. Show all posts

Thursday, December 27, 2012

Top Posts of 2012

It's crazy to think that I've been rocking this blog for six months now.  I was looking through some of my early posts and if feels like they were so long ago.  As 2012 winds down, I wanted to share my top 5 posts of the year:

1. Easy Costume: Wendy from Peter Pan
How to turn a nightgown from Sears and some ribbon into a quick Wendy costume


An amusing way to gussy up cash monies 


3. 5 Tips for Curling Stubbornly Straight Hair
How I get my crazy straight hair to stay curled, as well as a gift for my almost sister-in-law


The recipe for my favorite appetizer, Mini Meatloaf Bites


A look back at my little sister's wedding as well as a double-denim outfit


Thank you to everyone who has read and supported my little blog over the past few months!  For 2013 expect a lot more how-to posts as well as a (hopeful) improvement on my photography skills.  Can't wait to see you then! 

Thursday, November 29, 2012

Grabbing Winter by the Crochet Hooks

Something about winter makes me want to cozy up under some blankets, turn on the tv, and crochet until my wrists hurt.  When summer comes along I always forget about this particular hobby (because who wants to be surrounded by balls of yarn when it's 90 degrees?!) but as soon as the temperatures start to drop I remember that, yes, I was in the middle of making a ten foot long blanket.  Seriously, I once made a blanket that was so big I could not fold it by myself.

I used to stick with fairly standard stitches - you know, the single crochet, the double crochet, maybe toss in some chevron for kicks.  But lately I've been feeling up for a bit more of a challenge.  Luckily, Pinterest has been throwing some great new patterns my way.  Here are a couple of my new favorites:


Okay, so maybe that last pattern didn't have a name so I made one up.  I think Starburst is very appropriate.  

Have you accepted crochet into your life, and subsequently have many scarves you need to pawn off on unsuspecting friends and family members?  Do you have any favorite patterns to share?

Tuesday, November 27, 2012

Their Way / My Way: Christmas Decor

Now that it's post-Thanksgiving I can officially stop complaining about stores and radio stations celebrating the holiday too early and start getting into the Christmas spirit myself.  Last weekend I took the boyfriend to cut down Christmas trees with my family and some friends, and yesterday my roommate and I finished putting up our holiday decorations.  I actually managed to complete another Pinterest project for our mantle:


I ended up deciding I didn't want the canvas itself to light up, and put the final product up with a string of lights instead.  


I started by laying out the text and fonts I wanted in InDesign and printed off the design.  I tried to trace over the letters with permanent marker so that it would bleed through to the canvas.  Turns out I used too thick of paper so the marker didn't bleed through at all.  Instead, I ended up semi-free handing with pencil based on the design I printed out.


Next I filled in the sketch I made with Martha Stewart metallic paints.  These aren't very thick, so I put several coats on to make it opaque.  


I added some polka dots for good measure, of course.  


Next up: Lots of Christmas music and cookie baking!  Have you started celebrating the season yet?

Wednesday, November 21, 2012

Giving Cash as a Gift

I usually hate giving cash as a gift.  I know a lot of people like receiving cash (umm, including me!) but giving it always feels like a cop-out to me - like I couldn't be bothered to think of a gift for you.

That is, unless I find a way to give cash in an amusing or creative way.  My brother sent out a list for his birthday, and about half of the things he asked for were cash designated for specific things he wanted, like brewing beer and buying a new computer.  I thought to myself, those are noble causes.  Perhaps I should contribute.

I saw this on Pinterest and thought it was cute but maybe a little cheesy for my older brother:


But you know what isn't too cheesy for your older brother?  Beer.  Wrapped in money that's designated for making beer.  

Failure of a blogger that I am, I neglected to get pictures of the whole process.  However, I'm sure it's pretty easy to fill in the blanks.  

Step one: tape a whole lotta dollar bills together.  The more singles you have, the better.  After I went to get to the bank to change some twenties into singles, I felt like I was headed to (or perhaps from) the strip club every time I opened my wallet.  


Since you want the recipient to be able to spend these at some point, don't go too crazy with the tape!  I just put two little pieces on either end, just enough to keep them together. 

Step two: obtain some nice beers that come in a handy cardboard carrying case.  I went with Goose Island Pere Jacques since I knew it was one of my brother's favorites, but you could choose this kind if you prefer:


Step three: remove the bottles from the cardboard container.  Take a looksie at your box and eyeball approximately where the base of the bottle would hang out if it were still inside of the container.  Slice a  vertical slit in the box so that if you were, say, to have a dollar bill wrapped around the bottle, it would be able to escape through that slit if it wanted to.  I just used a plain old pair of scissors to achieve this, but for safety purposes you should probably use an exacto knife.  Make your slit about 2.75 inches long and 2 - 3 mm wide.

Step four:  This is the tricky part.  Remember the long string of dollar bills you made in step one?  I want you to wrap it around the base of one of the beers, leaving a long tail.  Stick the tail of the bills through the slit, then slowly put the bottle of beer back into the box, pulling the tail out of the slit as you go.  Did you do it?  Phew!  It took me a couple of trys to actually get the bottle in too.  Now you can roll your bottle back and forth until just a bit of the first dollar bill is sticking through the slot. 

Step five:  Write some directions on the box so the recipient knows what to do when they open their gift.  I simply chose "pull."  

Step six: Give.  And then laugh a whole lot.  Seriously, everyone at the table was dying.  Even though I knew what was coming I still laughed so hard I cried.  Luckily, the blog sister managed to capture a few actions shots:

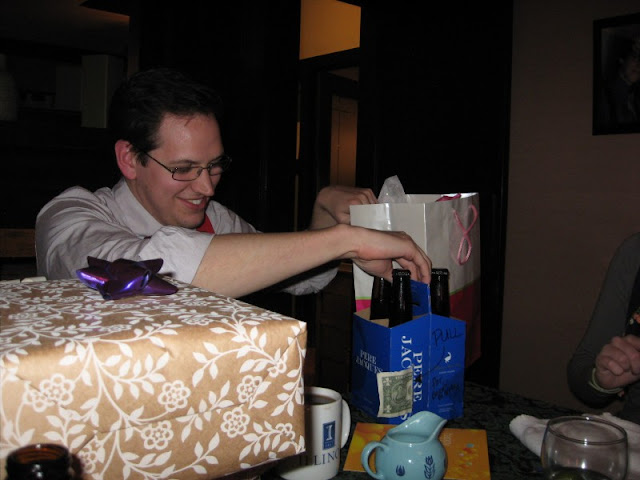
Brother says, "Hmmm, what's this attached to my present? 


"Maybe I should follow the clearly marked instructions!" 


Huzzah!  What a lucky boy!

I'm sure my brother would like you to know that he usually does not wear suspenders, a bow tie, or a button of himself to dinner.  Or maybe he would...

Wednesday, November 7, 2012

How-To Hair: Day Old Waves

Last weekend I was trying to get ready in a hurry and had to do something with my day old hair.  I wanted to look nice but still fun and casual.  These waves took about 5 minutes to create and turned into some fun dreadlocks the next morning, so double win.

(kind of weird picture due to the fact that my face was reacting to some spider bites - yay!)

Products: Dry Shampoo (I've tried a lot of brands, and Suave works best for me) and hairspray

Tools: 1-2 inch curling iron, fine tooth comb

Step one: This is a day-old look, so start by spraying the crap out of your hair with dry shampoo.  I like to let mine sit and dry while I put on makeup.  Once the dry shampoo has dried, brush out your hair.  This should take away any greasies you may have as well as add some volume.  

Step two: Pin back your bangs (or front section of hair) using two bobby pins crossed over one another.  If you'd like a little more height to your poof, tease your bangs a little first.  I then teased the hair around  my poof to add a little volume.

Step three: Spray hair with a healthy amount of hairspray.  Don't brush it through since this look is supposed to be a little messy.  Holding your curling iron vertically, wrap one inch sections once around the barrel, hold for 5-10 seconds and release.  Make sure to vary the direction you curl around the barrel as well as which part of your hair is curled (i.e., top, middle, bottom).  Don't curl your ends.  Add curls until you achieve the look you want.  


Good luck curling!